Question
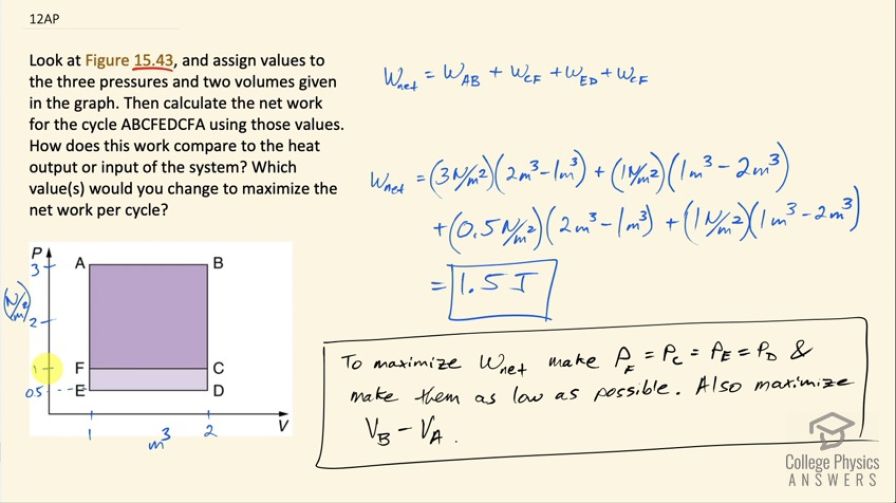
Look at Figure 15.43, and assign values to the three pressures and two volumes given in the graph. Then calculate the net work for the cycle ABCFEDCFA using those values. How does this work compare to the heat output or input of the system? Which value(s) would you change to maximize the net work per cycle?
Final Answer
To maximize net work the pressure at points F, C, E, and D should all be equal, and that pressure should be reduced as much as possible. Also, maximize the difference between volume at A and B.
Solution video
OpenStax College Physics for AP® Courses, Chapter 15, Problem 12 (Test Prep for AP® Courses)
vote with a rating of
votes with an average rating of
.
Calculator Screenshots

Video Transcript
This is College Physics Answers with Shaun Dychko. We are given this figure [15.43] and we are meant to make up some numbers for the axis and so I have 1 cubic meter for this left hand side of this rectangle and 2 cubic meters on the right hand side then for the pressure, we are having 0.5 at position E, 1 newton per square meter at F and then up to 3 newtons per square meter at A and then calculate the net work for a cycle that begins here at A and then travels to B and then to C and then to F, E, D, C, F and then back to A. So the net work done will be the sum of the work done during four different transitions so the transition from A to B will have some positive work done because there's going to be a change in the volume— there's an expansion— and then going from B to C since there's no volume change, there's no work done and then from C back to E, there's a negative amount of work done because volume is decreasing then F to E no work and then A to D some positive work but less than the amount done from C to F and then from D, we'll go back to C and then C to F again and then F to A. So the amount of work done on each leg is for part A to B, it's going to be 3 newtons per square meter—the pressure— multiplied by the change in volume because the work done is pressure times change of volume when the pressure is constant. So at 3 newtons per square meter times the final volume of 2 cubic meters minus the initial volume of 1 cubic meter so that's a total of 3 joules from that term and then plus 1 newton per meter squared at point C and then the final volume from C to F is 1 minus the initial volume of 2 so this is negative 1 joule in the end. And then going from F to E, there's no work since there's no volume change and then from E to D, there's some positive work it's 0.5 newtons per square meter— pressure—times a final volume of 2 minus an initial volume of 1 and this works out to 0.5 joules and then we go from C to F, which is the same amount of work done as we did last time from C to F, which is negative 1 joule and all of this works out to 1.5 joules. To maximize the net work done, we could make the pressure at points F, C, E and D the same so in other words get rid of this light-shaded purple region and have it just go... have E positioned here and D positioned here and erase this and then the cycle would go back and forth this way because when going from E to D, there would be a positive amount of work done equal to the negative work done from C to F whereas before with E and D lower, we have positive 0.5 joules being done whereas if E was raised up to the same level as F then this term would become positive 1 joule and it would compensate better for the negative work being done when going from C to F so that's one point. The next point is to take these now equal pressures and move them lower and as low as possible because the lower it is, the lower the pressure will be and with a lower pressure, there's going to be less negative work being done on this movement from C to F. And then lastly, we can maximize the difference between the volumes. So volume at point B, if this was moved over here there would be more work done because the pressure would be getting multiplied by a greater change in volume.